By Julian Weisner, Culinary Scientist
You’ve just cooked a steak sous vide [in a water bath], the meat is at the exact temperature you want to serve it. At the moment it looks kinda grey and bleh, so you are going to sear it to make it look pretty and taste good. That means you are going to add heat. But, if you add heat right now, you are going to increase its temperature and destroy the doneness.
Let’s hit pause. There is a way to have your steak and eat it too. The best thing to do is actually to wait some time between sous vide cooking and searing in order to improve the sear and preserve the doneness.
This post is going to explore the specifics of how and why this works, and give guidelines on how long to wait.
Warning! Warning! Beware! Science ahead!
If you don’t want to nerd out, feel free to jump to Hestan Cue’s Quick Guide to Searing Sous Vide Proteins, otherwise, come along for a ride!
Just in case you don’t know what sous vide is -sous vide is when you cook food inside a waterproof container, immersed in a water bath. The water bath is set to a low temperature and the heat from the water bath slowly works its way to the center of the food, ultimately cooking it. When done, you have something that is the exact temperature from edge to edge. After preparing proteins in this manner, you usually sear them for depth of flavor and texture.
Our goal when searing sous vide protein is to maximize color and texture without changing the temperature [doneness] of our food. To understand the best way to do this we need to utilize a few key concepts of cooking: heat, temperature, and heat capacity.
Heat
Heat is the flow of energy. The way we feel something as hot or cold is by feeling energy either flowing into us or out of us. In order to imagine this, think about the world on the super duper small scale of molecules and atoms. On this scale liquids and gases are a sea of bouncing molecules, and solids are fixed molecules that vibrate in place. The more energy these molecules have the faster they bounce and/or vibrate.
When a high energy [hot] object is in contact with a low energy [cold] object, the faster moving molecules transfer some of their energy to the slower moving molecules. The hot thing cools down, the cold thing heats up. This energy transfer is what we would describe as heat- energy moving from one place to another. This is the heart of cooking. Whether it’s energy from a pan going into a steak, or from an oven going into a cake, heat is what’s cooking.
Temperature
Temperature is the localized measurement of heat energy. It tells us how quickly molecules are bouncing or vibrating wherever we place our thermometer. Temperature alone can not tell us how much energy a whole object has because we also need to know how many molecules there are - or how big something is.
Heat Capacity
Heat capacity is the amount of heat energy required to raise the temperature of something a full degree. Generally speaking the more molecules something has, the more heat energy it will take to speed them all up.
Searing on the Cue
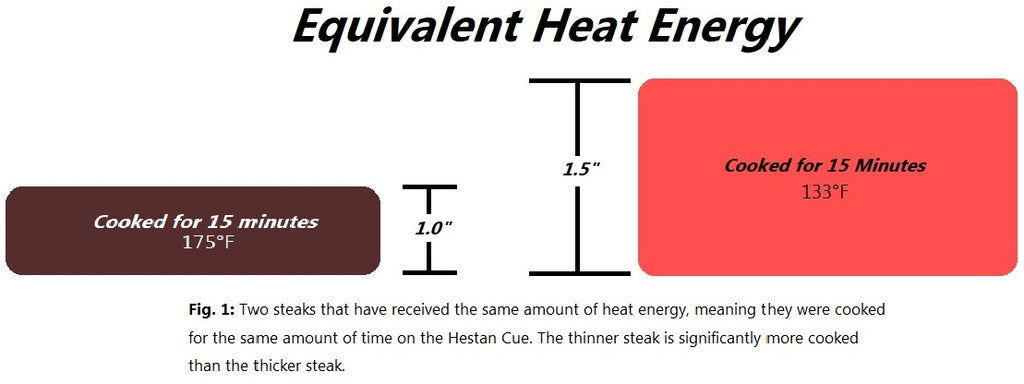
Here’s a real life example. Let’s say we have two NY Strip Steaks cooking in a pan. One steak is really, really thick, and the other steak is not so thick. We know that if we cook these steaks for the same amount of time and temperature, the thinner one will be more done [have a higher temperature] than the thicker one. This is a great way to think about heat, temperature, and heat capacity. Both of these steaks have received the same amount of heat energy, but they have incurred a different change in temperature. This is because the heat capacity of the larger steak is significantly more than the smaller steak.
How to Preserve Doneness
Now, let’s apply this science to sous vide proteins. After sous vide cooking, your meat is the perfect temperature all the way through. In other words, it has all of the heat energy we ever want it to have. We still want to add a sear though. We know that while we are searing, the meat will be receiving heat energy from the pan, so in order to preserve our doneness [total heat energy], we need to counteract this extra energy.
To effectively counter this sear energy, it would behoove us to know exactly how much energy we are dealing with. If searing were to impart only the energy of a fly, I don’t think we would be sitting here talking. It is probably more than that, but how much more? We could try to calculate the exact energy transfer, but this turns out to be marvelously complex. While searing, energy [heat] from the pan is used for countless other chemical interactions beyond heating the meat. The heat from the pan is used to evaporate moisture, render fat, and fuel browning reactions like malliard-ization and caramelization. All of these events cloud our ability to theoretically calculate how much of the energy will actually go into changing the temperature of the meat.

Here in the Hestan Cue Test Kitchen we have used our precision cooking technology to build an experiment where we accurately control the exact amount of heat energy used while searing. This has allowed us to understand exactly how searing can affect doneness and how we can offset this energy through cooling.
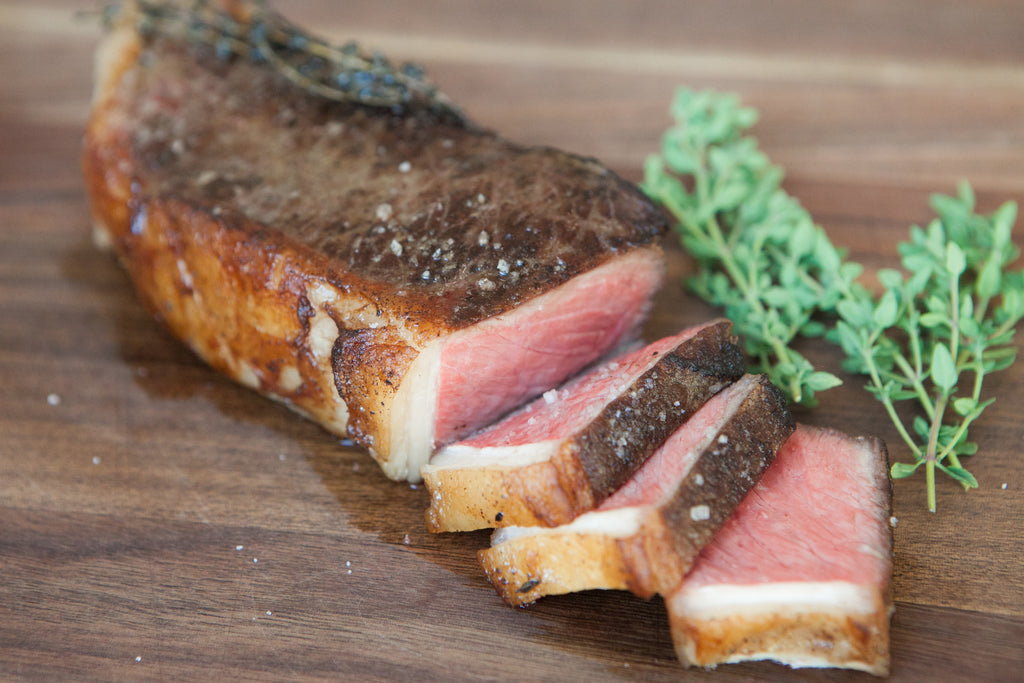
For our experiment we used one of our most popular cuts of meat, a New York Strip Steak.These steaks make wonderful test subjects because we can control each steak’s size and weight. For all of our experiments we sous vide the steaks between 120°F [rare] and 165°F [medium-well]. From there we seared each steak using the built in Sous Vide New York Strip Steak Searing recipe, found in the Hestan Cue app.
Although all of the following data is specific to New York strip steaks, the science and protocol will hold true for all other proteins. After our experimental analysis we will look specifically at how different proteins would change the results.
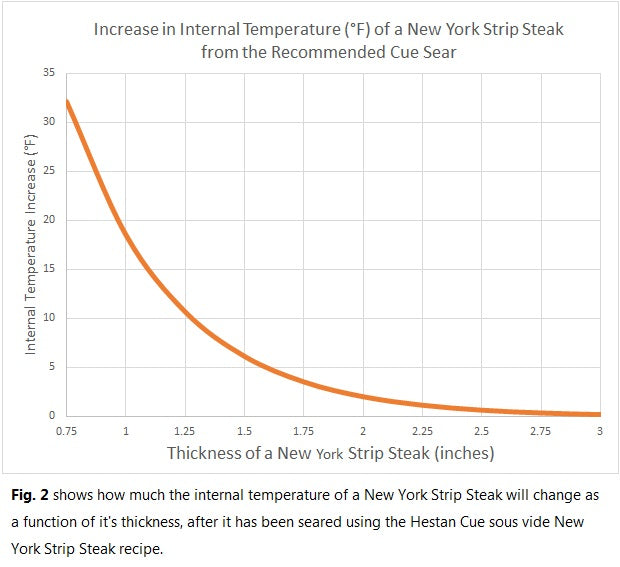
As explained earlier, we know that larger steaks will have a smaller change in temperature from the same amount of applied heat. Figure 2 depicts exactly how much change in temperature [doneness] each steak will have after the recommended Cue sear [same amount of applied heat]. It is important to note that this data is only from steaks that were cooked sous vide and seared shortly after. We can’t say for certain if these results would be the same for steaks directly out of the refrigerator.
Now that we know exactly how much each steak will change due to the heat from the sear, we can counter it with a few tools.The best tool at our disposal is time. After we sous vide our steak we can remove it from the bath, pull it out of the bag, and let it cool on a rack. This allows our steak to cool and dry! After the steak’s temperature has dropped we can sear without fear of exceeding our original target temperature [doneness].
But wait, why can’t I just cook my steak a few degrees under and sear it immediately?!
Well, you could... nothing is stopping you, but it won’t come out as good. As we mention in the Quick Guide to Sous Vide Searing, you want to ensure the steak is as dry as possible so that 100% of the time spent in the pan is used to develop color and texture, not to boil off excess moisture. While we are drying the steak, it’s going to cool down anyway, so why fight it? Dry it, cool it, and get a slam dunk sear!
You can use a thermometer to determine when the steaks have lost the right amount of energy [temperature], or we can use a little more science to predict how long it will take. Cooling is just like heating in reverse, it has to do with the heat capacity of the object and the difference in temperature between the object and the environment.
Just like for Figure 2, we ran experiments on a range of steaks. In this case we only looked at steaks with a range of thicknesses from 0.75” to 2”. This is because we noticed that steaks greater than 2” didn’t have a significant change in temperature from the Cue sear. All of the steaks were cooked to temperatures ranging from 120°F [rare] to 165°F [medium-well] just as in figure 2. After removing the steaks from the water bath, they were unwrapped and allowed to cool on a wire rack to ensure even drying. From the moment the steaks left the water bath temperature probes and data loggers were used to track the their internal temperature over time The data was then normalized by taking the difference between the steak’s temperature and the ambient temperature, this allows us to look at the cooling rate independent of the ambient temperature.
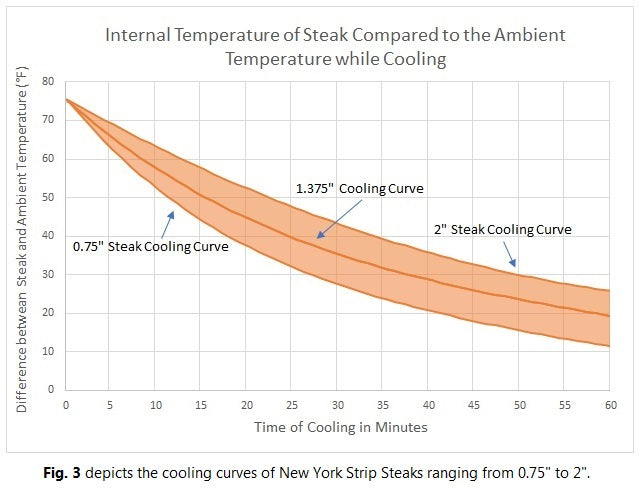
The ambient temperature in figure 3 is represented by the x-axis, and the steak’s temperature is the y-axis. The entire shaded area represents the different thicknesses of steaks. Since all of our steaks were cooked to the same max temperature (165°F) in the same environment, our cooling curves converge in the top left of figure 3, but since each thickness of steak has a different heat capacity, the curves diverge over time as the thicker steaks cool slower than the thinner steaks.
Now armed with these two tools we can perfect our New York Strip Steak Sear! All we need to do is look at how much the steaks temperature will change from the Cue Sear, and allow our steak to cool for the time we calculate from the cooling chart to insure we can - say it with us this time: sear without fear!
How to Sear for a Sous Vide New York Strip Steak
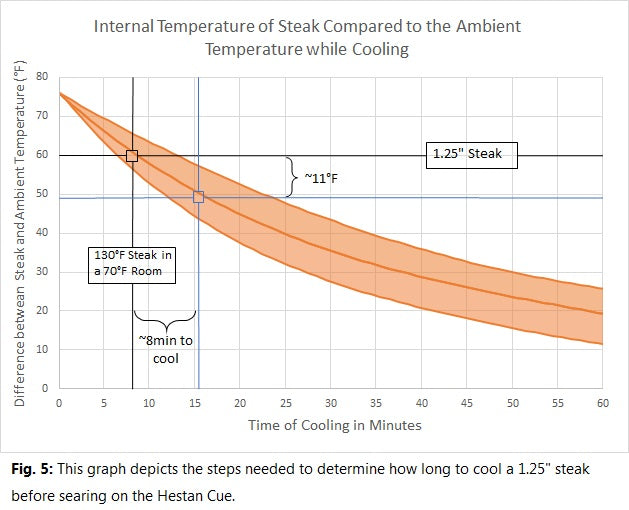
Here is an example with a 1.25” steak sous vide to 130°F [medium rare] in a 70°F room.
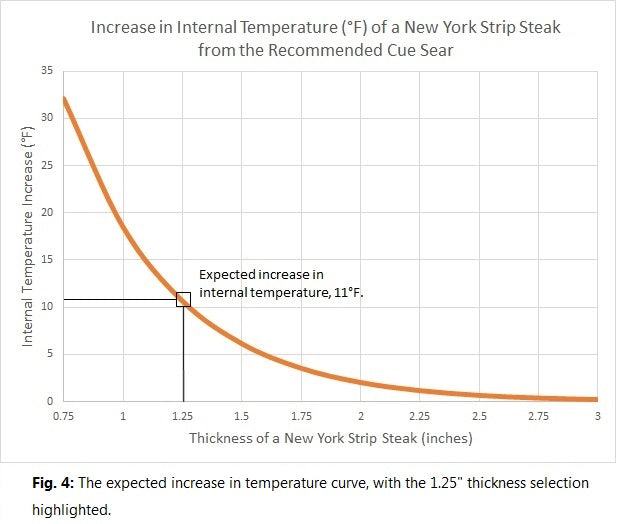
1) First, we look up how much the internal temperature will change when we sear on the Cue. As we can see in Figure 4, by tracing up from the 1.25” point on the x-axis, we intersect the curve around 11°F. This means that we expect an increase of 11° from the Cue Sear.
2) Now we find our starting position on the cooling curve. Since we are cooking the steak to 130° in a 70° room our starting value is 60° [130-70=60]. As we can see in Figure 5, tracing the 60° line over towards the 1.375” curve we find our starting location.
From this point we track 11°F down the y-axis and move along the x-axis until we are the same distance away from the 1.375” curve. This is our second point. The difference between these two points is about 8 minutes. This means we need to cool the steak for at least 8 minutes in order to sear without fear.
3) After our steak has cooled for the appropriate time, we sear using the recommended Cue method. First preheating the pan to 445°F (229°C), then adding 2 tbsp of butter, and searing for 1 minute on every side.
All said and done, 10 minutes after removing the steak from the water bath, we are ready to eat a perfect steak!
Pro Short Cuts for Searing
Ice bath
After cooking sous vide, drop your protein, bag and all, into an ice bath for 1 minute. Then remove, unwrap and finish cooling on a rack.
Pro: This will reduce the necessary cooling time by a few minutes and get your food onto the plate faster.
Con: You could potentially over cool your food, and your protein will be less dry when it goes into the pan, resulting in a poorer sear.
Skip Resting
After searing your food, you immediately slice and serve.
Pro: By slicing the meat directly after searing, you are halting the heat energy from working its way to the center of your food. This means that the outside of your meat will be slightly overcooked, but the inside will remain the correct temperature.
Con: This technique can only replace cooling for very thick steaks, since thinner steaks will have their doneness [temperature] altered during the sear. Cutting the steak directly after searing may also cause the meat juices to run more than they would with a couple minutes to rest.
Searing Other Proteins
As we mentioned earlier, the physics of this holds true for all other proteins but with slightly different characteristics.
Proteins with a greater heat capacity, like Chicken will have a smaller change in temperature from searing even for portions of the same thickness. Likewise, they will cool at a slower rate. So if you think about it, less heating from the sear and less cooling over time, balances the equation. In the same way, proteins with less heat capacity, like Lamb chops, will have a greater change in temperature from both the searing and cooling. All of this is to say, you can use these charts for all of your proteins. It may not be perfect, but it is a very good start.
Just to bring this home one more time, the moral of our story is: dry and cool any protein between sous vide cooking and searing. You will get a better sear, and will retain the doneness, that you have invested time and energy into (see what I did there?)
With all of that seared into your mind, go forth and conquer!
Check out the Hestan Cue app for iOS and Android to learn more about precision cooking with Cue, and all the things you can do! If you found this guide helpful, please let us know–we would love to hear your feedback.
Keep us posted with photos of your experiments and share your results and #CueTips in the Hestan Cue community!